Birdseye View Graphic
To provide you with a bird’s-eye view of this process, I have created a visual representation that encapsulates the entire approach. This graphic serves as a guide to the details that will follow, enabling you to grasp the overarching structure before delving into the nuances.
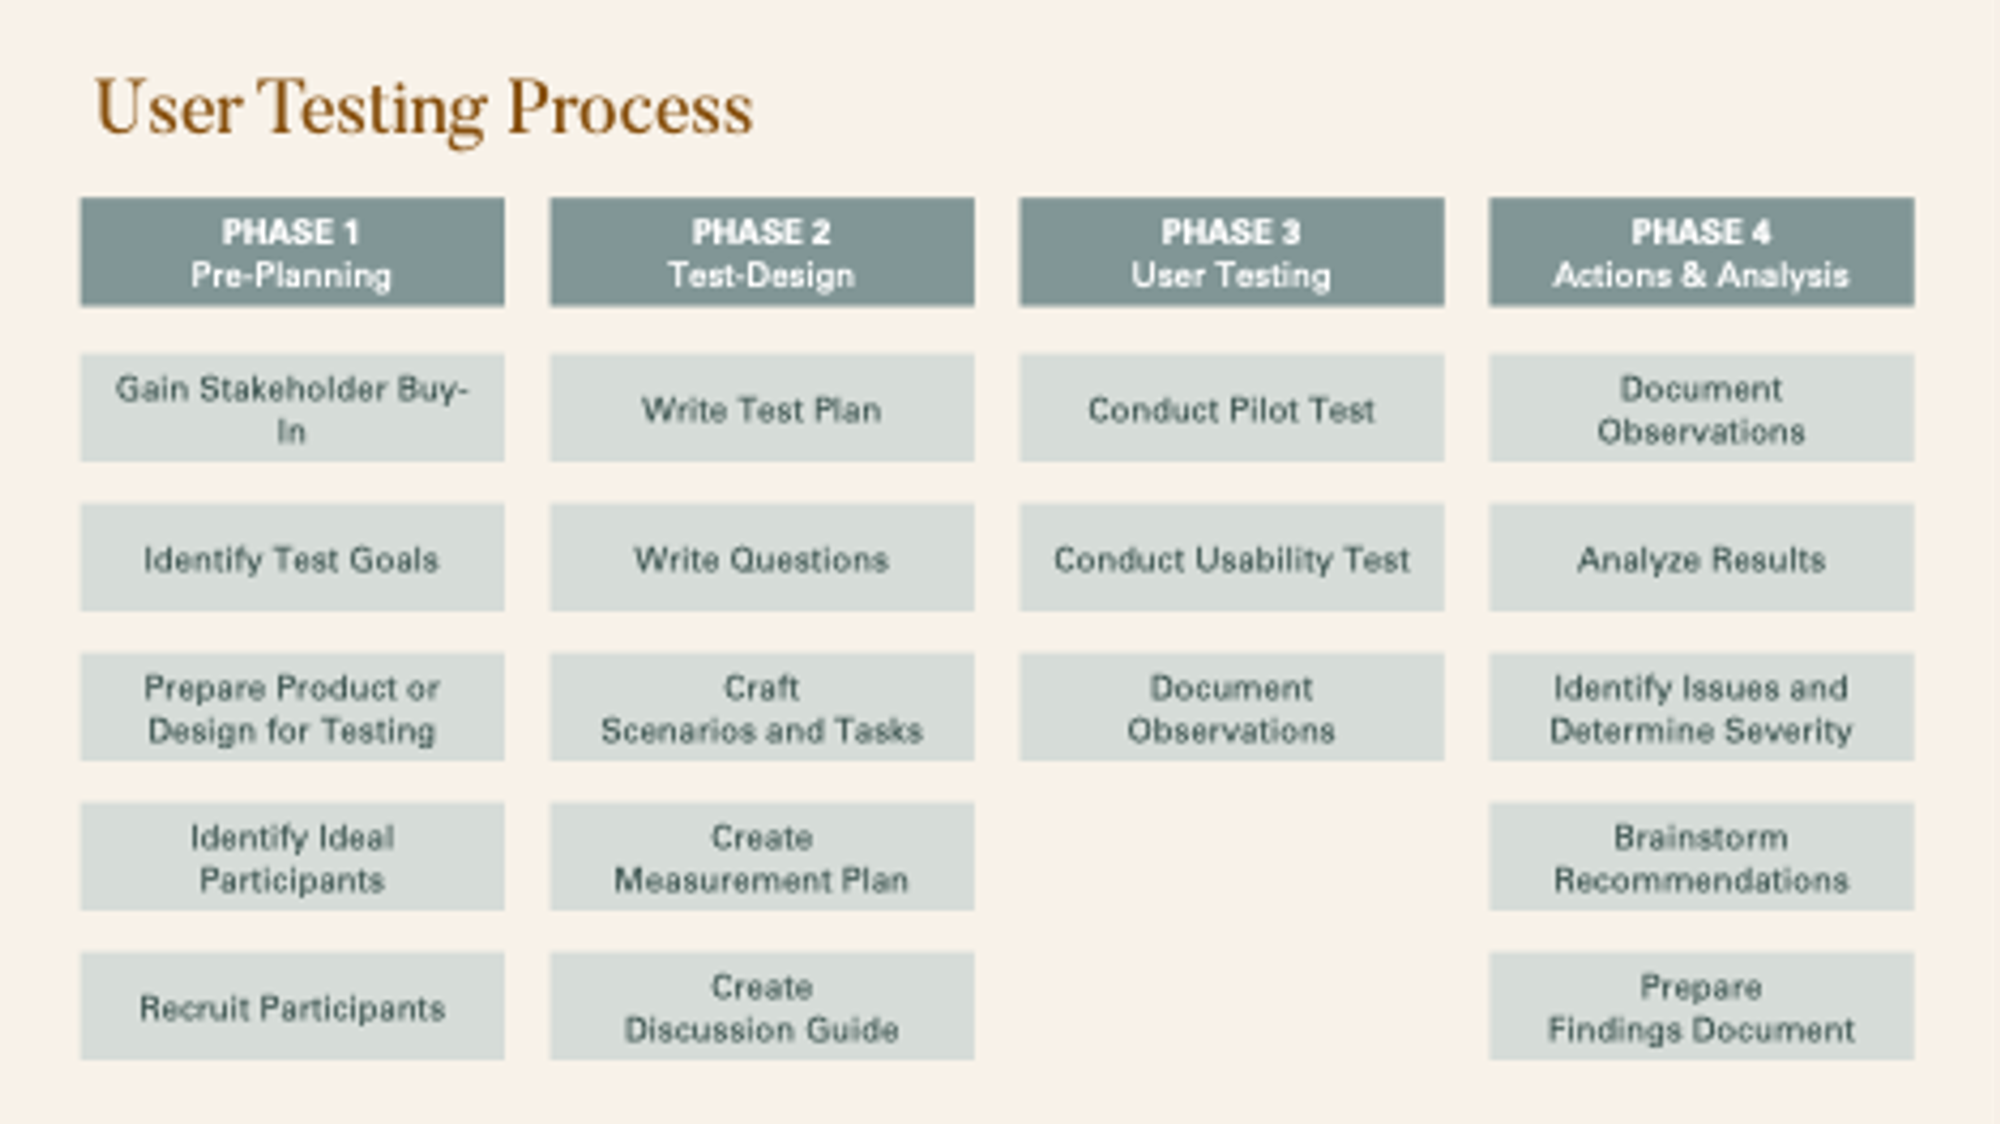
Phase 1: Pre-Planning
Before conducting user testing, it’s crucial to engage in some pre-planning activities to ensure that the testing process runs smoothly and that you achieve your desired outcomes. This phase involves several key activities:
Gain Stakeholder Buy-in
Securing stakeholder buy-in before investing in user testing is crucial, as it aligns support and resources, addresses concerns, and fosters collaboration. By educating stakeholders about the process, highlighting benefits, sharing success stories, creating a business case, and emphasizing data-driven insights, you can demonstrate the value of user testing and prevent potential project delays and conflicts.Identify Test Goals
Identify Test Goals
One of the first things you should do is identify your test goals. Document your learning objectives and describe the digital websites, mobile apps, or channels that will be a part of the usability test. Your test goals should be specific and measurable. By setting clear goals, you can ensure that your user testing activities align with your business objectives. Some common goals for user testing might include improving the user experience, identifying usability issues, and understanding user preferences and behavior.
Prepare Product or Design for Testing
Once you’ve identified your test goals, you’ll need to prepare your product or design for testing. You’ll need to determine how to represent your designs, whether it’s through paper sketches, whiteboards, wireframes, or a prototype. If you are testing on a live site, you’ll need to determine which sample pages or screens will be a part of your test. Preparing your product or design is an essential step in user testing, as it helps you to ensure that you’re testing the right elements and that you’re not wasting participants’ (or your teams) time.
Identify Ideal Participants
Identifying the ideal participants for your user testing is critical to its success. You’ll need to determine which user group you want to represent and identify which of your personas or customer segments are in scope. Once you’ve identified your target users, develop screening questions to ensure that you’re targeting the right participants. When creating your screening questions, be sure to ask questions that are relevant to your test goals and are not leading. It’s also important to determine how many participants you need based on how statistically relevant your user testing results need to be.
Recruit Participants
Once you’ve identified your target participants, you’ll need to recruit them. Determine where you’ll get your participants and offer an incentive (or a strong reason) to participate. It’s common to offer some sort of incentive, such as cash or a gift card, for participants’ time. When recruiting participants, be sure to communicate clearly about what you’re testing and why, how long the test will take, and what the incentive is for participating. You should also ensure that you’re recruiting a diverse group of participants that are representative of your target user group.
Phase 2: Test Design
After completing the pre-planning phase, it’s time to move on to test design. This phase involves crafting the details of your user testing process. Here are some activities to help you design your test:
Write Test Plan
The first thing you should do is develop a test plan that lists all the details of the usability study you’re preparing. Work with stakeholders and design team members to refine the test plan. By creating a comprehensive test plan, you can ensure that all necessary details are accounted for and that your team is aligned on the testing process.
Write Questions
Once you have your test plan, you can begin to document the profile questions you want to ask your target participants. These questions are used for categorizing results and understanding participant characteristics. You should also document additional qualitative questions you want to ask participants. Consider your learning objectives when crafting these questions. It’s important to avoid leading questions and to ask questions that are specific and relevant to the scenarios and tasks being tested.
Craft Scenarios and Tasks
Next, create specific scenarios that address your learning objectives. Scenarios provide context for the user about why they might be arriving at the experience being tested. For each scenario, list the tasks that you would like the user to attempt to complete. Be sure to write clear, specific instructions for each task. Crafting scenarios and tasks can help you to better understand how participants interact with your product or design and can provide valuable insights into usability issues.
Create a Measurement Plan
Document what data you want to capture during the usability test. For example, if understanding “task completion time” or “number of clicks” is a goal of the test, then this is a data point you’ll need to capture. Develop a plan for capturing each data point, whether it be through a question or by having the facilitator and notetakers observe and record the data. Creating a measurement plan can help you to ensure that you capture all necessary data points and can help you to more easily analyze the data post-testing.
Create a Discussion Guide
Develop a discussion guide that outlines how each individual session should be structured. The discussion guide should include an introduction to the study, a description of the scenarios and tasks, and questions to ask participants after completing each task. By developing a discussion guide, you can ensure that each testing session is structured in the same way and that you’re able to gather consistent data across all participants. Work with members of the research team to revise the discussion guide as needed. By following these test design activities, you can create a structured and effective user testing process that will help you to achieve your desired outcomes.
Phase 3: User Testing
Now it’s time to actually conduct your user test. This is where the real work happens! Here’s how to make the most of this phase:
Conduct a Pilot Test
Conducting a pilot test prior to the actual study helps in identifying and rectifying any potential issues during the real test. This way, everything runs as smoothly as possible. The pilot test includes running through all the questions, tasks, and scenarios a couple of days before the study, ensuring that all materials and equipment are ready, making necessary adjustments after the pilot test, and preparing all required documents such as consent forms and task sheets.
Conduct Usability Tests
Once you’ve conducted your pilot test, it’s time to move on to the actual study. Conduct the actual study by uniformly administering the user test to each participant, promptly documenting notes after the test, and, if time permits, debriefing with the research team. Stay flexible and open to feedback, and be prepared to make adjustments to the test plan, as the goal is to learn as much as possible from the participants.
Phase 4: Analysis & Actions
The final step of the user testing process is to analyze the results and develop actionable findings. This stage is critical in ensuring that the product is optimized for user experience.
Document Observations
The first step in analyzing user testing results is to document observations. Each member of the research team should provide their final observations about each user participant. These observations should be compiled into one place and organized for easier evaluation. Additionally, a quick report with any quantitative data points or metrics should be developed. This report will help the team understand the data collected and make data-driven decisions.
Analyze Results
Once the observations have been documented, the team should review and discuss them. This includes analyzing metrics such as completion rates, task success rates, and time on task. The team should identify themes and insights across all users and tests. Where possible, isolate results by customer segments/attributes to get deeper insights. This process helps the team understand how users are interacting with the product and identify any issues or areas for improvement.
Identify Issues and Determine Severity
As the team analyzes results, they should identify any issues and determine the severity of each usability issue encountered. The severity of an issue is determined by its impact on the user experience. High-severity issues may include anything that prevents users from completing tasks or using the product. Medium-severity issues may include anything that makes the product less efficient or less intuitive to use. Low-severity issues may include minor usability issues that do not significantly impact the user experience.
Brainstorm Recommendations
For key observations and issues, the team should brainstorm what actions should be taken next. In some cases, these may be improvements to the experience design. In other cases, this might involve collecting more research. The goal is to identify actionable recommendations that will improve the user experience.
Prepare Findings Document
The final step in the user testing process is to prepare a findings document. This document should summarize the results, issues, and recommendations. It should be clear and concise, making it easy for stakeholders to understand the key takeaways. The findings document will serve as a guide for the next steps in product development.